【WPF】非同期処理中に進捗ダイアログを表示する

はじめに
今回はVisual Studio 2019 C# + WPFで重い非同期処理を実行中にキャンセルボタン付きの進捗(プログレスバー)をモーダルで別ウィンドウに表示させてみたいと思います。
コードを全文記載しているのでコピペするだけでできます^^
いちいち作るの面倒くさい・・・という方は最後にプロジェクトごと丸々クローン出来るGithubのURLも載せてますw
環境
以下をすべて用意していることを前提とします。
- Visual Studio Community 2019
.NETデスクトップ開発とC++によるデスクトップ開発の機能を使用します。
もし、インストール時にこれらの機能を入れていなければVisual Studio InstallerからVisual Studio Community 2019の変更でこれらの機能をインストールしておいて下さい。
WPFアプリを作成する
C#のWPFアプリを作成します。
アプリ名はWpfProgressDialogとしておきます。
※.Net Frameworkは4.7.2を使用します。
※WPFアプリの作り方は過去記事をご参考にしてください。
madai21.hatenablog.com
以下の流れでアプリを作っていきます。
進捗ダイアログを作る
新規でウィンドウ(WPF)をProgressDialogの名前で作成します。
ProgressDialog.xaml(子にProgressDialog.xaml.cs)が追加されますので、まずはProgressDialog.xamlを以下のように編集します。
<Window x:Class="WpfProgressDialog.ProgressDialog"
        xmlns="http://schemas.microsoft.com/winfx/2006/xaml/presentation"
        xmlns:x="http://schemas.microsoft.com/winfx/2006/xaml"
        xmlns:d="http://schemas.microsoft.com/expression/blend/2008"
        xmlns:mc="http://schemas.openxmlformats.org/markup-compatibility/2006"
        xmlns:local="clr-namespace:WpfProgressDialog"
        mc:Ignorable="d"
        Title="{Binding PrgTitle}" Height="110" Width="300"
        WindowStartupLocation="CenterScreen"
        ResizeMode="NoResize">
    <Grid>
        <Grid.RowDefinitions>
            <RowDefinition Height="40"/>
            <RowDefinition Height="*"/>
        </Grid.RowDefinitions>
        <Grid Grid.Row="0" Margin="10">
            <ProgressBar Minimum="{Binding PrgMin}" Maximum="{Binding PrgMax}" Value="{Binding PrgVal}"/>
            <TextBlock Text="{Binding PrgPer}" TextAlignment="Center" VerticalAlignment="Center"/>
        </Grid>
        <Grid Grid.Row="1">
            <Grid.ColumnDefinitions>
                <ColumnDefinition Width="*"/>
                <ColumnDefinition Width="80"/>
            </Grid.ColumnDefinitions>
            <Label Grid.Column="0" Content="{Binding PrgStatus}" HorizontalContentAlignment="Center" VerticalContentAlignment="Center"/>
            <Button Grid.Column="1" Margin="10,5,10,5" Content="Cancel" Click="Cancel_Click"/>
        </Grid>
    </Grid>
</Window>
進捗ダイアログで後ほどViewModelで作る以下のプロパティにバインドしておきます。
次にProgressDialog.xaml.csを以下の内容で編集します。
using System;
using System.Collections.Generic;
using System.ComponentModel;
using System.Linq;
using System.Runtime.InteropServices;
using System.Text;
using System.Threading;
using System.Threading.Tasks;
using System.Windows;
using System.Windows.Controls;
using System.Windows.Data;
using System.Windows.Documents;
using System.Windows.Input;
using System.Windows.Interop;
using System.Windows.Media;
using System.Windows.Media.Imaging;
using System.Windows.Shapes;

namespace WpfProgressDialog
{
    /// <summary>
    /// ProgressDialog.xaml の相互作用ロジック
    /// </summary>
    public partial class ProgressDialog : Window
    {
        [DllImport("user32.dll")]
        private static extern int GetWindowLong(IntPtr hWnd, int nIndex);

        [DllImport("user32.dll")]
        private static extern int SetWindowLong(IntPtr hWnd, int nIndex, int dwNewLong);

        const int GWL_STYLE = -16;
        const int WS_SYSMENU = 0x80000;

        private BackgroundWorker worker = new BackgroundWorker();

        private Action action;

        private CancellationTokenSource cancelToken;

        private bool isCanceled = false;
        public bool IsCanceled
        {
            get
            {
                return isCanceled;
            }
        }


        public ProgressDialog(object context, Action action, CancellationTokenSource cancelToken)
        {
            InitializeComponent();

            DataContext = context;
            this.action = action;
            this.cancelToken = cancelToken;

            worker.DoWork += DoWork;
            worker.RunWorkerCompleted += RunWorkerCompleted;
            worker.RunWorkerAsync();
        }

        protected override void OnSourceInitialized(EventArgs e)
        {
            base.OnSourceInitialized(e);
            IntPtr handle = new WindowInteropHelper(this).Handle;
            int style = GetWindowLong(handle, GWL_STYLE);
            style = style & ~WS_SYSMENU;
            SetWindowLong(handle, GWL_STYLE, style);
        }

        private void DoWork(object sender, DoWorkEventArgs e)
        {
            if(action == null)
            {
                return;
            }

            Task task = Task.Factory.StartNew((obj) =>
            {
                action.Invoke();
            }, cancelToken);

            task.Wait();
        }

        private void RunWorkerCompleted(object sender, RunWorkerCompletedEventArgs e)
        {
            Close();
        }

        private void Cancel_Click(object sender, RoutedEventArgs e)
        {
            cancelToken.Cancel();
            isCanceled = true;
        }
    }
}
ポイントは以下の3点です。
進捗ダイアログとメインウィンドウ共通のViewModel(Model)を作る
新規でViewModel.csを作成し、以下のように編集します。
using System;
using System.Collections.Generic;
using System.ComponentModel;
using System.Linq;
using System.Runtime.CompilerServices;
using System.Text;
using System.Threading;
using System.Threading.Tasks;
using System.Windows;
using System.Windows.Input;
using System.Windows.Media.Imaging;

namespace WpfProgressDialog
{
    class ViewModel : INotifyPropertyChanged
    {
        public event PropertyChangedEventHandler PropertyChanged;
        private void NotifyPropertyChanged([CallerMemberName] String propertyName = "")
        {
            if (PropertyChanged != null)
            {
                PropertyChanged(this, new PropertyChangedEventArgs(propertyName));
            }
        }

        private string prgTitle = "Progress";
        public string PrgTitle
        {
            get
            {
                return prgTitle;
            }
            set
            {
                prgTitle = value;
                NotifyPropertyChanged();
            }
        }

        private string prgStatus = "処理実行中";
        public string PrgStatus
        {
            get
            {
                return prgStatus;
            }
            set
            {
                prgStatus = value;
                NotifyPropertyChanged();
            }
        }

        private int prgMin = 1;
        public int PrgMin
        {
            get
            {
                return prgMin;
            }
            set
            {
                prgMin = value;
                NotifyPropertyChanged();
            }
        }

        private int prgMax = 100;
        public int PrgMax
        {
            get
            {
                return prgMax;
            }
            set
            {
                prgMax = value;
                NotifyPropertyChanged();
            }
        }

        private int prgVal = 0;
        public int PrgVal
        {
            get
            {
                return prgVal;
            }
            set
            {
                prgVal = value;
                int range = (prgMax - prgMin) + 1;
                int percent = (int)(((double)prgVal / range) * 100);
                PrgPer = percent.ToString() + "%";
                NotifyPropertyChanged();
            }
        }

        private string prgPer = "0%";
        public string PrgPer
        {
            get
            {
                return prgPer;
            }
            set
            {
                prgPer = value;
                NotifyPropertyChanged();
            }
        }

        public ICommand ExecProgress
        {
            get
            {
                return new BaseCommand(new Action(() =>
                {
                    CancellationTokenSource cancelToken = new CancellationTokenSource();
                    PrgTitle = "処理実行中";
                    PrgVal = 0;
                    PrgMin = 1;
                    PrgMax = 100;
                    ProgressDialog pd = new ProgressDialog(this, () =>
                    {
                        for(PrgVal = 0; PrgVal < PrgMax; PrgVal++)
                        {
                            if(cancelToken != null && cancelToken.IsCancellationRequested)
                            {
                                return;
                            }
                            PrgStatus = "処理" + PrgVal.ToString("000") + "を実行しています";
                            Thread.Sleep(1000);
                        }
                    }, cancelToken);

                    pd.ShowDialog();
                    if (pd.IsCanceled)
                    {
                        MessageBox.Show("キャンセルしました", "Info", MessageBoxButton.OK);
                    }
                    else
                    {
                        MessageBox.Show("完了しました", "Info", MessageBoxButton.OK);
                    }
                }));
            }
        }
    }
}
主な編集内容は以下の2点です。
Command用にBaseCommand.csを新規で作成しておきましょう。
※BaseCommand.csの内容はこの記事で書いてます。
madai21.hatenablog.com
メインウィンドウのView(XAMLファイル)を編集する
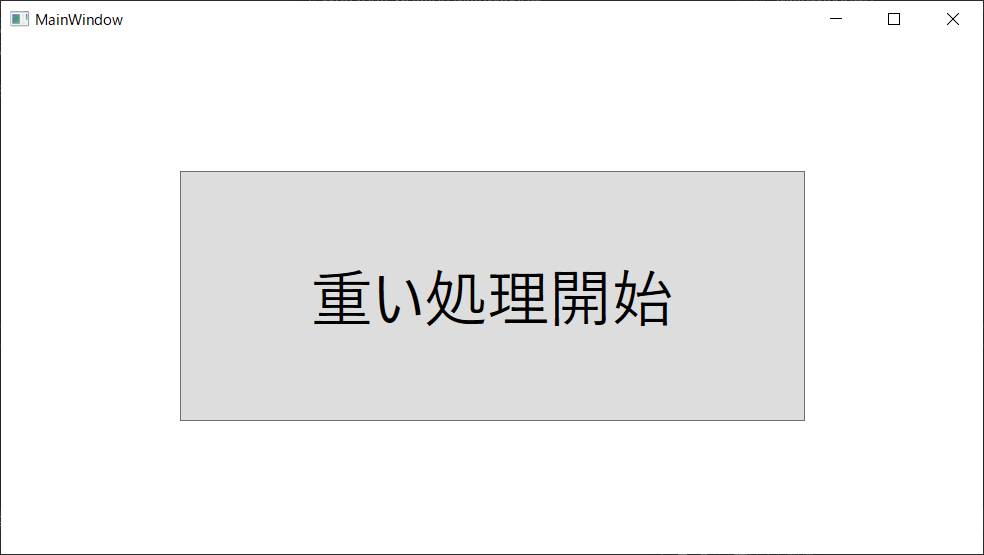
メインウィンドウには非同期処理を開始するためのボタンだけを配置するべくXAMLファイルを編集していきます。
XAMLファイルであるMainWindow.xamlを以下のように編集します。
<Window x:Class="WpfProgressDialog.MainWindow"
        xmlns="http://schemas.microsoft.com/winfx/2006/xaml/presentation"
        xmlns:x="http://schemas.microsoft.com/winfx/2006/xaml"
        xmlns:d="http://schemas.microsoft.com/expression/blend/2008"
        xmlns:mc="http://schemas.openxmlformats.org/markup-compatibility/2006"
        xmlns:local="clr-namespace:WpfProgressDialog"
        mc:Ignorable="d"
        Title="MainWindow" Height="450" Width="800">
    <Grid>
        <Button Width="500" Height="200" Content="重い処理開始" FontSize="50" Command="{Binding ExecProgress}"/>
    </Grid>
</Window>
MainWindow.xaml.csは以下のように編集して、DataContextにViewModelを設定しておきます。
using System;
using System.Collections.Generic;
using System.Linq;
using System.Text;
using System.Threading.Tasks;
using System.Windows;
using System.Windows.Controls;
using System.Windows.Data;
using System.Windows.Documents;
using System.Windows.Input;
using System.Windows.Media;
using System.Windows.Media.Imaging;
using System.Windows.Navigation;
using System.Windows.Shapes;

namespace WpfProgressDialog
{
    /// <summary>
    /// MainWindow.xaml の相互作用ロジック
    /// </summary>
    public partial class MainWindow : Window
    {
        private ViewModel vm;

        public MainWindow()
        {
            InitializeComponent();

            vm = new ViewModel();
            DataContext = vm;
        }
    }
}
では実行してみます。
以下のような画面が出ていると思います。
ボタンを押して処理を開始しましょう。

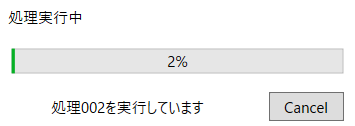
ボタンを押すと以下のように進捗ダイアログが表示して、進捗表示を更新してますね^^
※この動画ではうまく表示できていませんが、本来なら以下のようなタイトル付きの進捗ダイアログが出ているはずです。

おわりに
以下の場所から今回作成したプロジェクトを取得できます。
ご自由にお使いください。
github.com